Collections#
Introduction#
A typical Object Store contains a lot of folders and documents in a tree like structure. Especially when you are browsing the Object Store with the Windows File Explorer this can be to much information to show to the user. There is a high risk that the user may get lost in this large tree structure and has to do a lot of navigation before the relevant information is reached. If you are using Case Manager then the Case Folders are buried in large tree where the top level folder is hidden. In this case it is impossible for a user to navigate to a specific case.
To solution we provide for these problems are Collections. With collections you have more control how the content of the Object Store is presented to the user. Collections are special folders shown in the root of the Object Store. The content of these folders is determined by the collection configuration. Using this configuration the content is evaluated every time the content of the folder is fetched. Using this mechanisme you can give each user a view of the Object Store based on that user's needs.
There are three types of collections folders:
- Document Collections: the content of the collection folder are documents satisfying a specific document query.
- Folder Collections: there are two ways the content of this collection can be configured. The first way is similar to document collections, the folder contains all the folders satisfying a query. A second way to configure folder collections is to specify a path. In this case the content of the folder is the content of the folder pointing to that path.
- Case Collections: the content of the collection folder are cases satisfying a specific case query.
The current collections configuration is used for all users. For all the user the same collection folders are shown. You will see that using the different configuration possibilities the content of these folder can be highly personalized. You can even choose to only use collections as the root folders of the Object Store. In that case the normal root folders of the Object Store are hidden for the user. See TODO for more details.
Adding a new collection#
There are two ways you can use to add a new collection:
- Select New Collection from the Configurations section in the start page.
- Select New Collection from the toolbar in the Collections tab.
In both menu's you have to select the type a collection you want to create. First a dialog will appear where you have to supply the basic configuration of you collection:
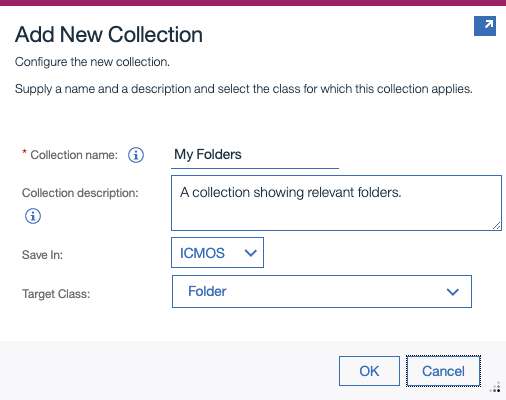
The Collection name you specify will be the initial name of the collection. This name can be changed later on. Another important setting is the Target Class. This choice of this class will determine the content of the collection. The collection editor is opened next. This is a Blockly interface where you can edit the different aspects of the collection.
Selecting the collection filter#
The first step you have to take is selecting a collection filter. You can choose the filter from the Collection Filters palette. As already mentioned above there are two types of collection filters:
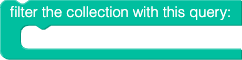
- A query based collection, relevant for all collection types:
- A path based collection, only relevant for folder collections:

Building a collection query#
You can build a collection query using the blocks from the Logic Operators and Values palette. By combining these blocks you can build a custom query.
A basic block you will need in almost every configuration is the comparison operator block:

With this block you can compare two values with each other. With the dropdown in the middle of the block you can select the type of comparison you want to perform. You have to specify a value for both sides of the operator. The basic values are already discussed in the Specifying Values section. Besides the basic values you can use some special extra values. Specific for queries is the Property Value block:

This is the value of a property of the object you want to query. The dropdow list contains all the properties of the object class that you specified when you created the collection. Only the properties which can be used in the WHERE clause of a query are shown. The editor will not check if the property values are compatible with each other.
If you want to check if a property is null (or not null) you can use the NULL operator block:

With the dropdow you can switch between a null and a non-null test.
To check if a property value is equal to one of the values in a (fixed) list you can use the IN LIST block:

Fixed values can be specified by appending the values to the block (currently only string values are supported):

A dynamic list can be accomplished with a data source returning an array with multiple values:

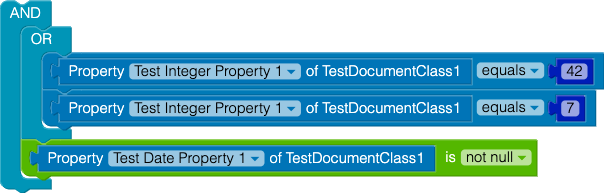
You can combine the different operators with the AND an OR blocks from the Logical Operators palette:


You can also nest these operators to create a more complex query:
Validating the collection query#
Using the editor you can build a query where the value on the left has a different type then the value on the left. You can use the Validate button to check if you have created a correct query. This action will execute a simplified query on the Object Store. In most case this will give you an indication of the error you have made. The query is also validated if you save the collection configuration.
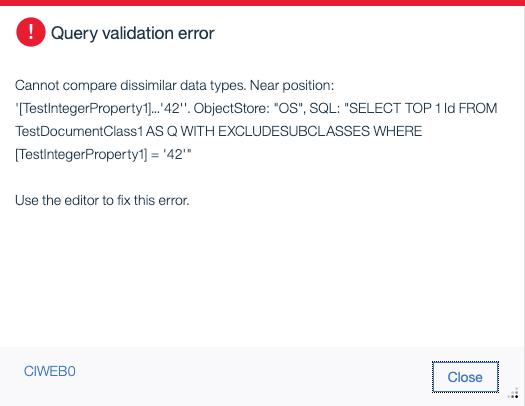
Consider this block, comparing a integer value with a string value:

If you validate this query then you will get the following error message:
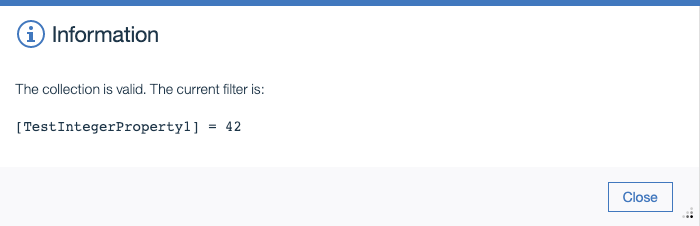
Fixing this error by using this configuration instead:

will give the following feedback:
Configuring nested queries#
TODO
Selecting the collection icon#
Often it is visually appealing to show a different icon for a collection. This is to differentiate the collection from regular folders. You can, for instance, choose a specific icon based on the the content of the collection. The icons you can choose are from the build-in icons of the Windows operating system.
To configure the icon of the collection you have to perform the following steps:
- Select a shell icon collection from the Icons palette. You can choose between two different icon collections.
- Attach the shell icon block to Collection Icon section and select the desired icon from the drop down list:
![]()